Bob's Projects & Ideas
Rebar Greenhouse
Rebar is usually purchased from a lumber yard or building supply store near you.
Why a Greenhouse?
After talking with customers on the phone all over the States and Canada I've found the biggest problem is the short growing season. It's shortened by those wretched one or two days of frost that is preceded AND followed by fantastic growing weather! We here in Altona had frost (27 degrees F.) on August 27, 1982 that killed our tomatoes, potatoes, cucumbers, squash, and cantaloupe. This was followed by many days in the nineties! It never got that frosty again till over a month later! We also had a solo "spoiler" frost on June 8th of that year.
I Double My Growing Season!
No wonder greenhouses are sprouting up. My Rebar greenhouse has only one layer of poly on it, yet in 1982 it prolonged the growth period by over 2 months. And it's only heated by the sun. In 1982 the frost-free growing season was only 3 months for warm crops. My rebar greenhouse doubled it.
Build Your Own Greenhouse and Save Money!
I just read a very attractive full-color catalog advertising a 10' x 12' home-attached greenhouse at a special introductory price of $6000 (excluding fans and shutters. It's beautiful with double glass and laminated wood beams. Few are fortunate to be able to purchase such a jewel. So, build your own. I wanted an "El cheapo" freestanding greenhouse, which was simple to build.
Eureka! I Found One!
One day I suddenly devised a solution. Use rebar. Rebar are those long rusty-colored iron rods placed in concrete to strength it. I have built the first rebar greenhouse, but of course that won't make the Guinness book of Records!
Below, here for our customers, are my directions for building an 11' x 50' rebar greenhouse and a 26' x 65' rebar and wood greenhouse.
Why The Arch Shape?
The shape of our rebar greenhouse is like half a tube (i.e. Quonset). Tunnel greenhouses are quite popular because they heat up so fast, having less interior air to heat compared to any other shape. Also the shape is very strong and eliminates the building of a roof and uses less material. It's so fast to erect that I still can't believe it. And it uses less poly to cover it than any other design per sq. foot of growing area. It is very wind resistant and deflects the wind over it. For greater strength, you can insert supports in it if snowdrifts cover it, like here. With the long side facing south it is interesting that when the sun directly strikes the greenhouse perpendicularly at some point in the curve, giving maximum heat and light. It's the ideal shape.
Remarks About Rebar
If you want a wider rebar greenhouse, you can buy longer rods or weld two together. In that case I would use one-inch diameter rebar. One advantage of rebar is that its small diameter blocks little light. For example, all the rebar used in the arches of my 50 foot greenhouse take up less space that the cross-section of just two two-by-six pieces of wood! Impressive eh? I should mention here that the rebar has grooves or corrugations in it, perfect for holding it in the soil, but, being rough it could abrade regular poly. That's why I only use woven poly that I sell as it's so tough. Also, since the rebar lets in so much light there can be leaf burning with regular poly, however woven poly scatters the light preventing leaf burning.
Using Other Pipe: PVC, Conduit
A tunnel greenhouse can easily be built from WHITE (not black) PVC pipe (say 2 inches in diameter) if you have the proper connectors. On the other hand PVC pipe can cost more. Rebar is easy to fasten with twine. And it can be poked into the soil easily. Another material some use is silver-colored electrical conduit pipe but a pipe bender machine may be needed.
The Frame
Decide What Direction to Align The Long Axis of the Greenhouse.
In northern or cool areas you will probably want to run your greenhouse east-west, so that the long side faces south. That way there is maximum solar heat gained in those few hours just before till after noontime when the sun is in the south, especially in spring or fall. In the southern latitudes I'd probably face the greenhouse east and west to lower noontime temperatures, though with the sun being so high in lower latitudes it might not make much difference.
Mark the long axis on the soil. I stretched a cord. Mark the other long side, which was 11' away in my case.
Arches
Poke the first rebar rod about 8 inches into the soil. Stick the other end in (it bends easily). This is the first hoop! Wasn't that easy? Continue making arches the same way. I spaced the others about 3 feet apart. The woven poly I sell will easily take 6-ft. spacings!
Bracing
Top Bracing
Tie the arches together by fastening a rebar along the top, joining the arches. I use that cheap nylon twine (binder twine or baler twine) that farmers use to tie up hay bales. It comes in large rolls. You can use rebar tying wire. Diagonals stiffen the whole structure.
Side Bracing
For stability fasten additional rebar rods at diagonal angles along the sides.
Ventilation
Due to its optimal shape the rebar greenhouse becomes hot quickly. Large openings should be built into both ends and both sides if needed for ventilation.
Vents at Both Ends
I built large 9 by 6-foot vents in each end of my large rebar greenhouse. They are hinged at the bottom and open outward so as to conserve greenhouse space. Likewise the doors.
Vents Along Both Sides
Nail studs (two by fours) horizontally to the rebar arches just above the ground (to prevent rotting). Then nail another set horizontally and parallel to the first about a foot away. Then you can install a long vent on them, hinged at the bottom studs so that they can open out and down. That vent can simply be a piece of plywood or poly on a frame. I built some window vents higher up as well, but it's harder to reach and do it easily. The high humidity caused by my water trench inside the greenhouse helped my plants not wilt when it was hot. Even so install as many vents as you can as a Quonset shape promotes fast heat gain in sunshine.
Doors
The door itself can be new or used, conventional or made of a poly-covered rectangle. After deciding what kind of door I want, I lay the door on the ground. Then I build a wooden frame around it and hinge the door to it. Then I set the whole frame upright beneath the end rebar arch. Then attach it to a vertical stud, which on top is secured to the rebar arch by long nails curled around the rebar rod.
Painting/Wrapping
Rebar rods if left in a rusty brown state can get quite hot and this will shorten your poly life somewhat. To reduce heating you can paint the rods white or silver, wrap with poly to make it smooth. Some cover the rebar with white PVC pipe.
The Woven Cover
We custom heat-seal the 10 foot widths to make any width you want. Order your poly long enough to drape over the ends as well as the sides. You'll need to bring it around the ends to fasten it, so order it large enough (It's important... Our 11' x 50' rebar greenhouse used 20' x 65' of woven poly.)
Attaching The Woven Poly
The next step is to attach the poly to the frame. The first alternative (nailing) is more secure. The second alternative (burying) is more easily changed, rearranged, or removed.
Method A (Nailing)
Nail boards to the rebar rods along the ground using u-shaped nails or bending over long nails. The poly can be fastened to those boards using our cinchstrap and wide-headed roofing nails. Then the end poly is pleated into the folds and nailed down tightly to the wooden studs that support the doors and end vents.
Method B (Burying)
There is also a different way to secure the bottom edges. I sometimes lay the poly flat on the soil, place boards on that, and anchor with heavy stones or concrete blocks. This way no nails pierce the poly. And the poly can be removed in the summer.
Bigger Rebar Greenhouse Needs Thicker Rebar And Some Guide Sockets
Our 65-ft. x 26-ft greenhouse was made using 3/4" diameter 32.5' long rebar and cost less than $200 for frame! If I ever do another such large rebar greenhouse I'll use standard 40' long 1" (ONE-INCH) thick rebar! In order to get the arches evenly curved on so large an expanse, we came up with the idea of first hammering short lengths of electrical conduit pipe into the ground as guide sockets at the angle we wanted the rebar to leave the soil. Then the 3/4" rebar ends neatly fit into the 2-ft long 1" diameter electrical conduit pipes pounded 18" into soil. For one-inch rebar, which would be better, you'd have to use thicker diameters of conduit pipe.
Extra Braces Of Lumber And Rebar
The building process was similar to that outlined for the 11 x 50 rebar greenhouse described earlier, but the 26 x 65 because it was wider and longer required some additional steps. The 3/4" rebar was really too flimsy for the width involved and ended up having to be braced all the way along the rebar at the right and left side of each arch. We used half inch rebar diagonal 'braces' to tie 3/4" arches together.
Again, remember that 1" (ONE INCH) thick rebar would be better. It would still need cross bracing of course, just because of the width. We made vertical tomato stacks from left over rebar offcuts.
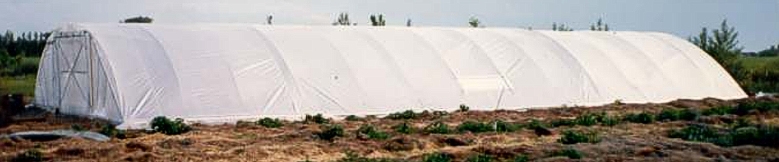
It's solar-heated, 80 degrees F. outside on sunny days. All the wood is painted white for light reflection. There are two large 6' x 9' hinged door vents of wood and plastic, which open outward each end, hinged at bottom, several long side vents, and a water filled trench. Raised beds were planted with watermelon and cantaloupe. Note that heavy mulching means no weeds and little watering. Keeping plants heavily mulched reduces weeding &watering. Our woven poly cover we attached ONLY at bottom along long sides held by our polyfastener nailed on 2x4" boards nailed to bottom of rebar 6" above soil to prevent rotting. (Curl long nails in 2x4's around rebar.) We made the poly extra-long to drape over & cover wooden end, doors & vents. We made the poly extra wide to form outside trenches along sides to catch scarce rain off greenhouse. We also made poly channels inside to fill 2' deep 5' wide woven-poly-greenhouse-plastic-lined trench on right covered partly by pathway boards. Ensuing humidity prevents wilting at 100 degrees F. Three months after planting, Tarzan-like squash, watermelon, cantaloupe &cucumber vines hung from rebar arches, hitting unsuspecting foreheads! Also corn, beets, raspberries. We grew all sorts of things. Compared to a wood frame rebar lets in tremendous light, never rots, is fast to erect, cheap & strong.
My latest rebar greenhouse is 10' x 140' and uses the same techniques as my smaller one. For the 11' x 50'greenhouse I used rebar 20 feet long by half inch in diameter. They cost me $3.50 each: much cheaper than lumber. The 11' by 50' greenhouse cost me about $100 for the rebar. I used about 18 rods for the length, another 8 for the diagonal bracing & top "spine". It took an hour to put up the rebar hoops. Framing the ends in with wood took some additional time. It's just 6 feet high so as to make it as wide as possible & to give it a lower profile to cooling winds. Being so low means snow can accumulate, so snow clearing is needed.
Bob's Greenhouse Tips
Larger Greenhouses Can Cost Less Per Square Foot Increasing Floor Area By 145% May Take Only 65% More Poly
Greenhouse "A"
Say that Greenhouse A is a Quonset greenhouse 30 feet long by 11 foot wide (20 ft rebar rods). Floor area is 30 x 11 feet = 330 sq.ft. growing space. Including enough plastic to drape over each end by 7 feet, the poly cover needed is 20 by 44 feet = 880 sq.ft of poly.
Greenhouse "B"
Say that Greenhouse B is also a Quonset 30 feet long but is 27 feet wide (33 ft. rebar). Floor area is 30 by 27 feet = 810 sq.ft. growing space. Again including enough plastic to drape over each end by 7 feet, the poly cover needed would be 33 by 44 ft. = 1452 sq.ft. poly.
Comparing B:A Floor Area
B:A = 810/330 = 245%, POLY NEEDED B:A = 1452/880 = 165% In this example, increasing floor area to almost 1 half x used only about 1 2/3 x as much poly. Larger structures use less poly and lumber/pipe/rebar per sq.ft. of growing area, and have less surface area of poly to lose heat!